

| [Photo Credit: www.skinnermetalproducts.com] |
Perhaps you'd appreciate a little background first? If not, scroll down a couple paragraphs because I'm feeling wordy this morning! To begin I should tell you that my father is a welder as well as my brother and a couple of my cousins. That is how I came to be searching the web for a sewing pattern in the first place.
One mark of a good and safe welder's cap is that it is made of 100% cotton (linen may work as well). That makes sense because we all know that synthetics like nylon and polyester melt when exposed to heat and flame. Also, as you can imagine, welding is a hot job and a breathable, absorbent material like cotton is preferable. One's hair and back of neck are exposed when wearing a welder's protective mask. The cap part of a weldering hat is made to stop the sparks from burning hair while the soft, short bill is turned around backwards to cover and protect the neck. And lastly, the adjustable halo straps of a welding mask are made that much more comfortable when cushioned by a welder's hat.
And besides all that, I think welding hats are cute! What do you think? Can you imagine what they would look like with a few fabric flowers, yo-yos, buttons, and broaches to fancy them up a bit? Welding hats could really be fashionable. The cap part is deep so it will cover a lot of square inches of hair. It was a little too deep for me and my pony tail so I folded the back of the hat band up in the back. This revealed a peek at the fabric of the reverse side and let me wear my pony tail a bit higher. I think it's a cute look.
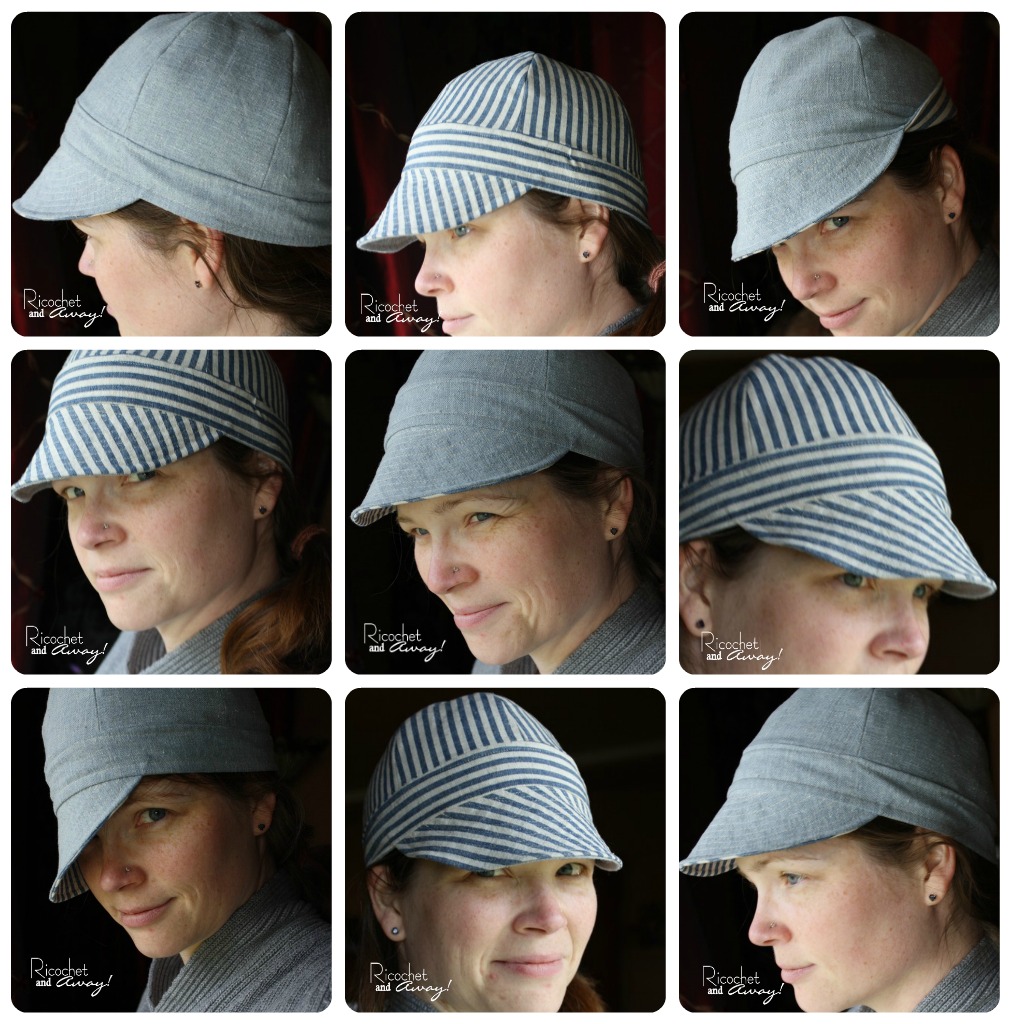
OK, now onto the the DIY part of this post! I found a w-o-n-d-e-r-f-u-l FREE pattern online. Special thanks to fellow flickr member Seamingly Simple! You can find her ingenious pattern HERE and the instructions HERE. Or you can find it on PatternReview.com HERE. Did I mention the hat is REVERSIBLE? No? Well, it is and that's another pretty cool thing, right?
What you'll need:
- The printable pattern.
- 1/2 yard of fabric. (1/4 yard for each side since it's reversible)
- A scrap of thin quilt batting OR interfacing for the bill. I didn't use either in the hat I made for myself because the fabrics I chose were of a heavier weight. I used Craft Bond fusible interfacing in the bill of the hat I made for my son.
- Coordinating thread. (contrasting thread might be fun for the top-stitching)
- A little time. The first hat took me an hour start to finish, but second one took me only 30 min.
Some tips that I found helpful:
- Cutting the bill fabric on the bias is not necessary, but I like the look and how it lays nice and flat on the curved seam.
- The instructions concerning construction of the crown were confusing to me. I ended up making 2 bowl-shaped caps, attached the bill to one of the bands, and then attached the bands to the caps. From there I stitched the two hats together, right sides together, around the the bottom of the band. I left an opening and pulled the right sides through just like when I attach the lining to a purse.
- I trimmed the seam allowances of the curved seam of the bill with pinking shears. That just seemed easier than cutting out a bunch of little notches to ease the curve.
- The "scale bar" on the printable pattern is ingenious! Just so you know, if you print it out at 100%, the scale bar measures 10cm and the pattern is perfect for a 25" head. If you print it out at 96%, the scale bar measures 9.6cm, at 93% it measures 9.3cm and so on. You can totally customize this pattern to fit ANY head size.
 |
| My son likes his hat, but suggests I make another one for him using "tougher, boyish" fabric! |
 |
| [source] Here's a similar hat that I found from Nordstrom. Shorten the bill of the welder's hat and make it out of tweed? |
 |
| [source] This is a pageboy hat from TJ Maxx. Make some fabric buttons to decorate your welder's hat? |
Happy crafting and big hugs from Montana,


If you're here in April 2012 vote for your fave Typography Challenge entry:
If you're here before June 1st, 2012 please check out the "I'll wear it in public!" sewing challnege:

Rikka, you are so crafty!!! I love the hat and the story that goes along with it!!!!
ReplyDeleteYou look fabulous in your welder's hat, Rikka. Thanks for the background... I had never heard of a welder's hat.
ReplyDeleteLove the hat pattern and want to use it so bad. I am having problems with my printer printing it to scale though. I think I am the problems though. I hope I can get it to work. If anyone has suggestions or can tell me how to enlarge the pattern to fit a size 23 pleae let me know.
ReplyDeleteIf you print it out at 93% of the original size, your scale bar should measure 9.3cm and be the perfect fit for a 23 inch head. This is the procedure I use for my printouts: When I have the pattern image downloaded and open on my computer open (I open it in Windows Photo Gallery but many programs will open it) I hit "print" > deselect "fit picture to frame" > select "options" > "page layout" > "reduce/enlarge document" by "percentage" > I type in the percentage > then "print" again. Hopefully you'll get it all figured out. Read the comments in flickr as well and see if they can help you out.
DeleteThanks so much!! You don't know how much I appreciated your help. YOU ARE A SWEETHEART!! I will try this and see if I can get it to work...Thanks again.
ReplyDeleteI was able to make it work going to Paint!!! In print you can go to page lay out and do the percentages there. It took awhile for me to realize that the photo galleries for Windows XP don't do the percentages anymore, but pixels mostly. That was my problem, everything is going to newer versions where percentages aren't used. This is really sad for cases like this.Thanks for your help!!! Soooooooooo appreciated!!! Case solved!!
ReplyDeleteJust wondering...do any of you serge the edges so they don't fray?
ReplyDeleteI didn't serge mine. I suppose you could trim 'em with pinking shears to stop fraying as well. If you try serging, please let us know how it turns out.
DeleteI have serged the edges using my daughter in law's serger. Turns out great and looks nice. The only thing is that you have to watch your seam allowance because a couple of times it showed through on the right side of the material..lol..I am just a so so type of sewer. I would give myself a "C"..lol I taught for 32 years and retired now so everything is still graded for me I guess. I was just curious if I was the only one that did that. It takes a little longer to make the caps but I think they would last longer. Also, I wash my material so that when I sew it won't shrink after sewing and be too small.
ReplyDeleteRicochet, I need to ask you something and wondered if I can email you? You might can help me in another situation with sewing. email me at dianhanson@aol.com
Thanks so much for your continued response.
I just emailed you. Thanks for the serging info. :-)
DeleteRikka, I just found this project and I love it. I pinned this project, so I can come and see the instructions later. Thanks for all the information.
ReplyDeleteHave a nice day.
Marisa.
This is great my brother just started a welding program and as a quilter I have tons of smaller pieces of cotton around.
ReplyDeletethanks a bunch!
Great Welding Cap pattern, guys are loving them! Thank you!
ReplyDeleteWhat a great idea! I do all sorts of crafts but never find much to make for my man-this is perfect! And all his buddies will be asking for them too :-) -perfect excuse to BUY MORE FABRIC!
ReplyDeleteI am enjoying reading your page. I came to your site in search of a free pattern for a six pannel welders hat. I cant seem to find how to find it to download and print.
ReplyDeleteOh my goodness, this is just what I needed!! So excited. Thank you for posting about it!!!
ReplyDeleteI'm a beginner at sewing but I will try this! My stepson has begged me to make one for him and with the help of this site, I think I can do it!
ReplyDeleteThanks so much for sharing this!
how do you size it down to a 18 inches
ReplyDeleteIf you print out the pattern sheet at 72%, the hat will fit an 18 inch head. The equation looks like this:
Delete100%/25in = X%/18in.
X = 72%
Or for those of you who need a simpler solution, just multiply your inches by 4 and that will equal the percentage at which to print the pattern. For example, a 21 inch size will need to be printed at 84% (21×4=84).
I printed out the pattern. It is very small so I am assuming I need to cut them out and enlarge them individually on my printer???
ReplyDeleteThere is a "key" on your pattern that should measure out as 10cm. I'm sure key is the wrong term, but you should be able to locate a solid line segment on your pattern sheet and realise that is what I'm talking about. At 100%, your key should measure 10cm and produce a hat to fit a 25 inch head. You shouldn't have to cut out the pieces individually. Just measure the key and see how long it is, and you'll have a starting point. It's been over a year since I have messed with this pattern, but I clearly remember printing out patterns to fit 18"(kids) to 28"(big mens) heads and having each pattern fit on one sheet of printer paper. I hope that helps.
Delete"Scale bar" is the correct term, not key!
DeleteHow could I make this into a "high crown" cap?
ReplyDeleteI would add vertical height to the panel pieces, but this could be tricky because you might end up with a chef's style hat. Your best bet is to experiment with cheap fabric like an old sheet. Then, just add an inch or so to the vertical height of the panels, only cut and sew together the panels (forget about the bands and rim), and then you'll see what kind of shape you'll end up with.
DeleteWhen attaching bill and bands are you suppose to sew bands together I'm lost lol
ReplyDeleteSorry Amber, not sure I know what you are asking.... I found the instructions a little confusing as well. In this post I wrote about how I strayed from the directions when I sewed my hats.
DeleteI have extra band when sewing it to the cap, Any advice
ReplyDeleteI would double check your seam allowance....otherwise, I'm not sure unless I could get a look at what you're dealing with.
DeleteI can't seem to print the pattern. I don't know what I am doing wrong..... could you e-mail me the welding cap pdf.?
ReplyDeleteSorry you are having problems. As you can see from previous comments, you are not the first to have trouble. It's not my pattern, so I will not distribute it. Apologies.
DeleteWhen I open up the pattern, I right click on the image and select "print". When the print preview window appears, I see six basically blank pages, and the actual pattern is on the seventh page. I print only the last page.
Deletedoesn't work for me when I do this. If I try printing 100% it moves the pattern off the page.
ReplyDeleteYou could double check your margins and/or try portrait vs. landscape settings. When you print at 50% does the scale bar measure 5cm?
DeleteI had to turn the pattern image into a PDF document. The Adobe print dialog lets you do scaling.
DeleteI've sewed a few of these hats for welders. The top seems to turn out a little too pointy. Is there a way to have it turn out a little more rounded?
ReplyDeletei've done several now and what I have found is you really have to make sure you're fabric is laying flat on the inside, especially at the crown top or it will bubble and end up pointy. I also trim down the extra fabic at the top crown so you don't have a bunch of extra stuffed in there when you try to flip it.
DeleteJust wondering if you have figured out how to translate the inches measurement into actual hat sizes like size 7, or 7 1/8 or 7 1/4?
ReplyDeleteI can't make out the seam allowance that's noted on the pattern sheet. What is it? Thanks!
ReplyDeletedoo you need to prewash your fabric
ReplyDeleteI'm a little new at sewing. I like the welding cap that you have. I would like the patern. I didn't find the down load for it in this post. May I have the pattern. I would greatly appreciate it.
ReplyDeleteI've never even thought about making my own welder cap until recently. Thank you for putting together this page. Even though this is quite old now, I have a question. Each one I try to make comes out with too much excess fabric on the top of my head where the side pieces meet. How can I correct this. Seems like If I adjust this, it ends the same way once I top stitch the seams.
ReplyDeleteHow could I make this into a "high crown" cap?
ReplyDeleteWelding inspector course